
Hello everyone! :)
Which one you prefer, natural makeup or full cover makeup? Umm, anything in between? o.O
If that's you, I would like to recommend a foundation which I recently fell in love.
 |
| KATE's Secret Skin Maker Zero The Base Zero SPF18 PA++ (Liquid + Powder) 02 Average Toned Skin (Formerly OC-C) |
Perhaps you may heard of this brand before. Two years ago, I did a review on KATE's eyeshadow palette before. If interested, click here to read. :D
Herein a limited edition set from KATE's newly launched foundation line - THE BASE ZERO. Their aim is to create a foundation that has tight-fitting coverage, creates beautiful and even skin with no cakey feeling.
The set consists of one (1) liquid foundation of 30ml and one (1) face loose powder of 2g.
Herein a limited edition set from KATE's newly launched foundation line - THE BASE ZERO. Their aim is to create a foundation that has tight-fitting coverage, creates beautiful and even skin with no cakey feeling.
The set consists of one (1) liquid foundation of 30ml and one (1) face loose powder of 2g.
 |
| KATE's Secret Skin Maker Zero The Base Zero SPF18 PA++ (Liquid 30ml + Powder 2g) |
KATE always gives this mysterious and classy impression by using full black packaging. Quite their signature.
 |
| Close-up |
KATE's Secret Skin Maker Zero THE BASE ZERO (Liquid) 30ml

As you can see (from photo above), it is a pump-type liquid foundation which gives more control on the amount. And much hygiene too. One big bonus to those who dislike artificial fragrance. This product is fragrance free (sniff sniff again, YASSS confirmed).
Check out the shade 02 Average Toned Skin (Formerly OC-C) here.

As you can see (below), the foundation will slip down as I slanted my hand a bit, but not to the extend it is too watery. For me, it is just the nice consistency, right in the middle.
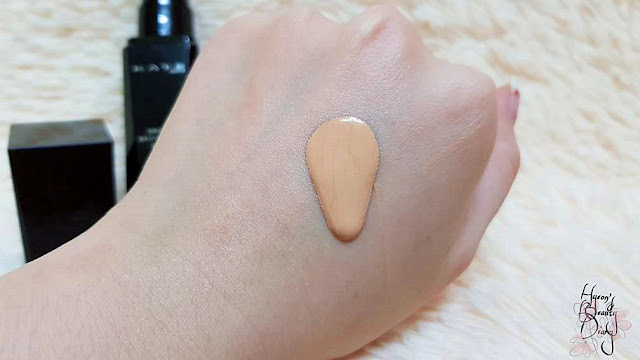
Don't judge the shade you see right after extracted from the bottle. The color will become lighter once applied onto the skin.
Here I am going to do a comparison by just applying the liquid foundation on one side of my face.


Check out the shade 02 Average Toned Skin (Formerly OC-C) here.

As you can see (below), the foundation will slip down as I slanted my hand a bit, but not to the extend it is too watery. For me, it is just the nice consistency, right in the middle.

Don't judge the shade you see right after extracted from the bottle. The color will become lighter once applied onto the skin.
Here I am going to do a comparison by just applying the liquid foundation on one side of my face.


Before After
The result is obvious, isn't it? :D My dark circle and freckles are not so visible now from photos (although you can still see it in close distance).
I'm in love with its natural touch and matte finishing. Likey-likey.
KATE's Secret Skin Maker Zero THE BASE ZERO (Face Powder) 2g
 |
| Close up |
As it wasn't much product information available when I purchased this limited edition foundation set, I thought it was a pressed powder. So I was surprised to find that it is in fact a loose type of powder. Don't mention I was even surprised to see such a mini packaging. Nothing like what I expected at all. (heh)
It comes with a powder puff (as below).

Remove the protective sticker (as below).

The powder is nice and loose (as below).

As for application, I prefer to use a powder brush instead the powder puff. That's just how I usually do with any powder product. Using a powder brush will lower the chance of stamping the product onto the face (you know what I mean? heh).

Here I am going to brush it all over my face.


Applying After
It does smooth out the surface, but frankly speaking, I don't see any big difference after applying it on top of the liquid foundation (earlier). In fact, I think I could go without this powder foundation as it might look like I had a heavy/thick base makeup.
How to choose your shade?
For higher accuracy, what I did was to try on their testers at Watson. Take a small amount and apply as instructed in the video.
***
If you ask me, I do prefer the liquid foundation than the face powder. The liquid foundation has better adherence and coverage. Plus, it is formulated to turn into matte-finish when the foundation sets.
In this case, personally I don't think it is necessary to go in with the face powder after applying the liquid foundation. It will only make the base makeup looks thick and easier to get cakey throughout the day.
However, let alone the powder foundation, I think it could serves as finishing powder when you wish to tone down dewy/shimmering face makeup.
This product is available on Hermo and Watson.
**********************************************************************
Rating: Liquid foundation - 4.5/5; Powder foundation - 2.5/5
Recommend: Highly recommend the liquid foundation for everyday makeup.
Repurchase: Perhaps.
Recommend: Highly recommend the liquid foundation for everyday makeup.
Repurchase: Perhaps.
For your reference.
**********************************************************************
**********************************************************************
Is this product review helpful?
Leave a simple comment below because I long to hear from you. *^0^*
Cheers!^^


Social Icons