Etude House | 에뛰드 하우스

[Review] Etude House Honey Cera Lip Oil

April 11, 2020

[Review] Etude House Honey Cera Lip Oil

Hello everyone!

I know it's very late to share this review, but I pushed it on before that's how much I love this product (Dear Etude House, are you reading this?)

soulmatehyeon; Etude House Honey Cera Lip Oil


Product Description

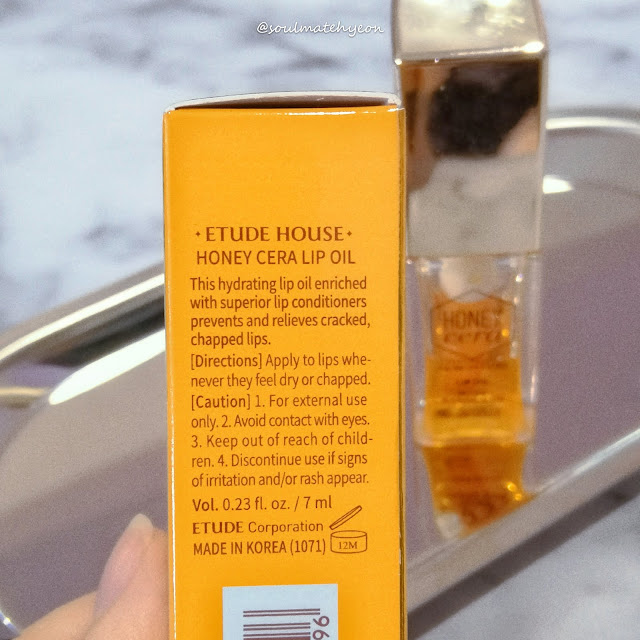
Etude House's Honey Cera Lip Oil is a lip product with enriched hydrating lip conditioners to prevent and relief cracked and chapped lips. It part of Honey Cera Lineup.


soulmatehyeon; Etude House Honey Cera Lip Oil


Specifically it contains honey extracts (100ppm), royal jelly, ceramide and 98% vegetable oils (argania spinosa kernel oil, sunflower seed oil, soybean oil, etc.) which provides extra moistful lip care


soulmatehyeon; Etude House Honey Cera Lip Oil


Source : Skincarisma


Size

It comes in 7ml / 0.23 fl. oz. Good enough for 3 to 4 months usage, if you are a daily user.


soulmatehyeon; Etude House Honey Cera Lip Oil


Packaging

The glass-like packaging is actually made of sturdy plastic, so it's worry-free to carry around in your bag. I must say, the packaging looks classy.


soulmatehyeon; Etude House Honey Cera Lip Oil


soulmatehyeon; Etude House Honey Cera Lip Oil


Scent and Texture

It has this sweet and sticky honey scent - you can't miss for sure. I wouldn't mind to apply it on my lips because it kinda makes my lips "delicious" in some sense (lol).

To call it "lip oil" would be a bit misleading. Its texture is more sticky and gluey like honey. It will form a "honey-like" protection layer on top of your lips and keep your lips hydrated. Definitely recommended for winter season. You might as well can skip this product if you are not looking for something so intense.


Application

It comes with a flat applicator. Apply whenever you feel your lips dry or chapped.


Price

It was priced around RM35 if you get it locally. 

Sadly to say, this product has been discontinued 😭 Geez, I wish I had stocked up!


Verdict

I must say, it has superb hydrating effect for emergency situation. Often times I found my lips with peeled dead skin and it's awfully disgusting as well as painful. This lip oil is almost like an instant remedy!


- Rating: 5/5

- Recommend: For serious dry and chapped lips.

- Repurchase: How I wish to repurchase as long as it is not been discountinued.


For your reference.


***************************************************************************


Is this product review helpful?

Leave a simple comment below and tell me what do you think about this product. 🌹

[Review] Etude House - Sunprise Mild Watery Light SPF50+ PA+++

June 23, 2018

[Review] Etude House - Sunprise Mild Watery Light SPF50+ PA+++

Hello everyone! :) Hyeon's Beauty Diary is back~! \\(^0^)//

If you had read my previous Monthly Project on "Reapplying Sunscreen: Is it possible?", you are no stranger to this product which I am going to share with you now.


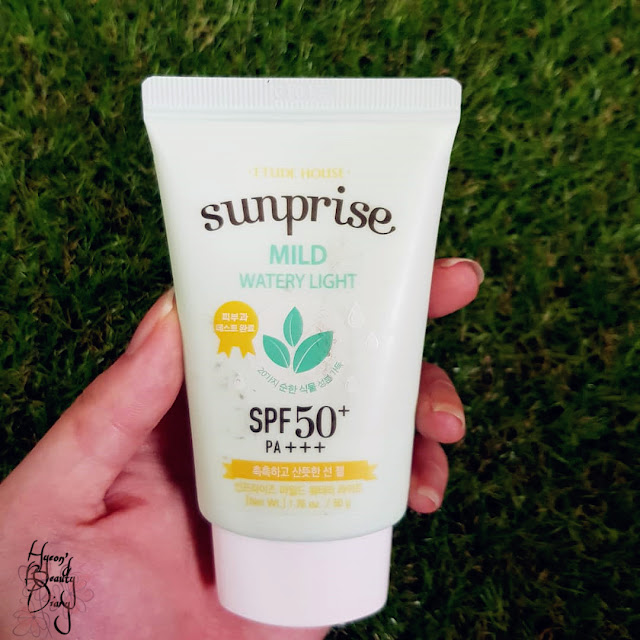
Review; Etude House's Sunprise Mild Watery Light SPF50 / PA+++
Etude House's Sunprise Mild Watery Light | 에뛰드 하우스 선프라이즈 마일드 워터리 라이트 SPF50+ PA+++ | 50g


[Monthly Project] #18 Tried and Tested : Reapplying sunscreen, is it possible?

April 30, 2018

[Monthly Project] #18 Tried and Tested : Reapplying sunscreen, is it possible?

Monthly Project (April 2018)

#18 Tried and Tested : Reapplying sunscreen, is it possible?


I am intended to make this blog post a simple and sweet one, so I am going to jump right into the content asap.

Just before I proceed any further, this Monthly Project is inspired by Renée (@Gothamista) where she shared the "DIY Sunscreen Cushion For Easy Reapplication!" via her YouTube channel (like a year ago) (Check out her YouTube channel here) :D


What you can expect from this post:
  • Easy 1-2-3 step to make your very own DIY sunscreen cushion for reapplication;
  • Find out whether DIY sunscreen cushion is a HIT or MISS.


Monthly Project; #18 Tried and Tested : Reapplying sunscreen, is it possible?


What you need for this DIY:

  • Cushion case;
  • Sunscreen;
  • Moisturizing emulsion (optional);
  • Fragrance (optional).

Monthly Project; #18 Tried and Tested : Reapplying sunscreen, is it possible?


In the original DIY tutorial demonstrated by Renée, she uses two items only: It’s My's Cushion Case and Etude House's Sunprise Mild Watery Light SPF 50 PA+++.

So I did modify a bit here, by adding the moisturizing emulsion/gel - SON&PARK's Beauty Gel (to give an extra touch of moisture) and fragrance - Mamonde's Rose Water Toner (for it's rosy scent).

I will leave the price list at the end of this post. If you're intended to purchase, this is just for your reference.

Let's get started! :D


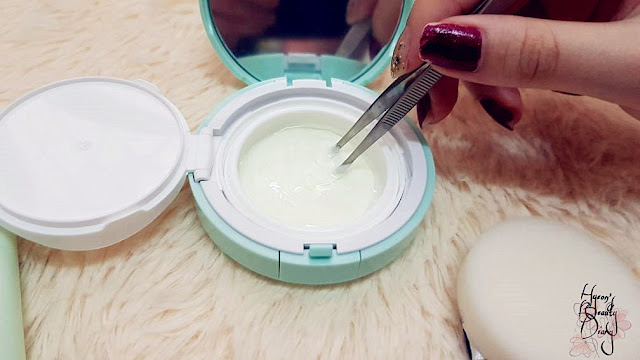
Step ① Remove the cushion from the container.

Monthly Project; #18 Tried and Tested : Reapplying sunscreen, is it possible?


This step is quite self-explanatory. Pretty straightforward.

Hygiene per say, do recommended to use a tool (i.e. tweezers) rather than bare hands. Make sure the tool is clean.


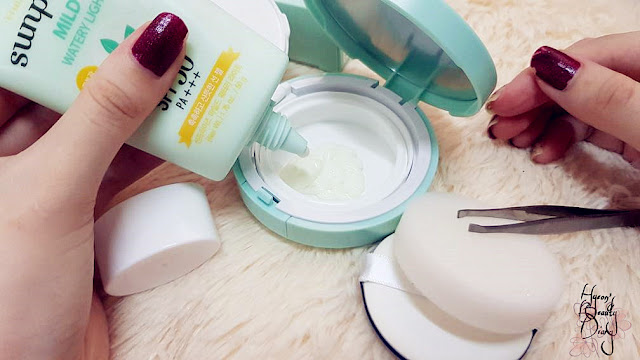
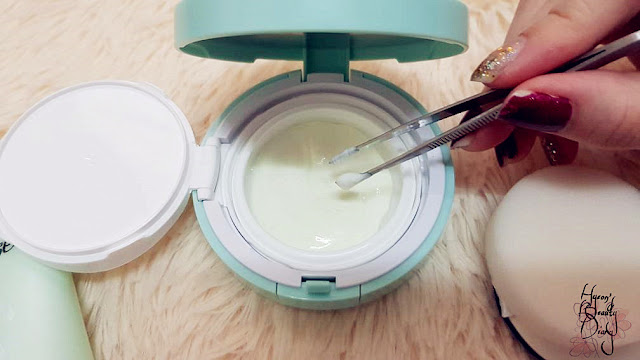
Step ② Fill in the sunscreen into the container for about 1/3 (generously!!!).

Monthly Project; #18 Tried and Tested : Reapplying sunscreen, is it possible?


I do agree with Renée's selection of sunscreen. Etude House's Sunprise Mild Watery Light SPF 50 PA+++ is definitely a great choice because of it's thin/light formula, 100% mineral-based sunscreen; besides, it leaves no white cast.

Nonetheless, I was quite reserved at this point as I didn't pour as much as 1/3 of the container at the first-attempt.

After then I realized I wasn't following closely to Renée's DIY tutorial. That's why. So I ended up adding more into it afterwards.

Peeps, do take note!!! Fill in at least 1/3 of the container.


Step ③ Add 1-2 full pumps of moisturizing emulsion/gel (optional).

Monthly Project; #18 Tried and Tested : Reapplying sunscreen, is it possible?


In fact, this step was not included in the original DIY.

I added a few pumps of moisturizing emulsion with the intention of replenishing moisture to the skin during reapplying sunscreen.

Often my skin appears flaky throughout the day, especially during hot and humid days.

SON&PARK's Beauty Gel has the cooling and moisturizing potential at the same time, so that's why I incorporated this product into this DIY.

It's absolutely optional, depending on your preference.


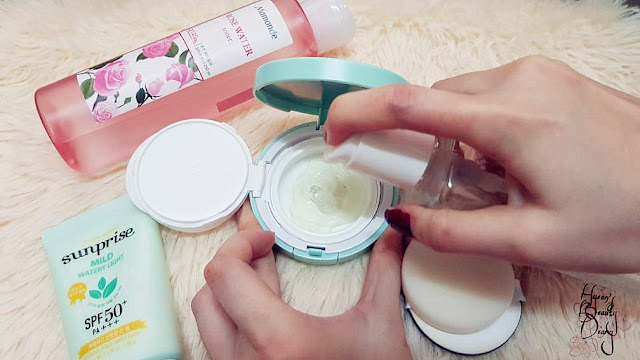
Step ④ Add a few drops of fragrance (optional).

Monthly Project; #18 Tried and Tested : Reapplying sunscreen, is it possible?


In spite I often commented that I hate artificial laboratory kind-of fragrance, I really adore the rosy sweet scent from Mamonde's Rose Water Toner. The relaxing rosy scent helps sooth tiredness.

Just a few drops will do, not too much until the formula becomes watery. 


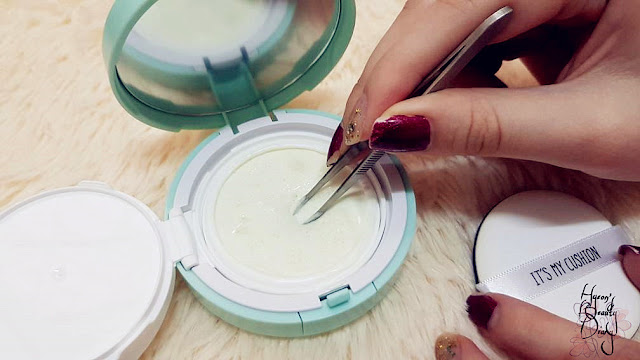
Step ⑤ Give it a good mix.

Monthly Project; #18 Tried and Tested : Reapplying sunscreen, is it possible?

Give it a flip.

Monthly Project; #18 Tried and Tested : Reapplying sunscreen, is it possible?


Step ⑥ Put back the cushion into container.

Monthly Project; #18 Tried and Tested : Reapplying sunscreen, is it possible?


Monthly Project; #18 Tried and Tested : Reapplying sunscreen, is it possible?


***

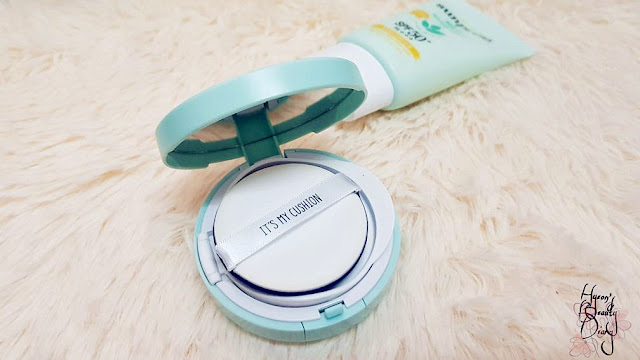
Ta-da!!! Here you go. Your very own DIY Sunscreen Cushion (limited edition too)! :p

Let's give it a try and see if it delivers what it claims.


Monthly Project; #18 Tried and Tested : Reapplying sunscreen, is it possible?


From the look at the cushion puff, I can already tell that it is super moisturizing! Can't wait to try on my skin!

As you can see (below) at the back of my hand, it leaves water marks on top of the skin where I just applied the DIY sunscreen cushion.


Monthly Project; #18 Tried and Tested : Reapplying sunscreen, is it possible?


Definitely moisturizing, but I am just curious about its sun-protection power after the modification. :/

And there is one way to find out...


Monthly Project; #18 Tried and Tested : Reapplying sunscreen, is it possible?


Fast forward the time to 3 months later...

And as I am sharing with you now, this is an experience talk from what I have observed throughout the testing period.

No doubt, the modified sunscreen cushion viscosity was watery and it feels like nothing of the original sunscreen texture while reapplying on the skin.

I do enjoy the cooling effect from it, but I'm not too sure am I getting the same sun-protection as I reapplying it.

Hence, I added more sunscreen into the container to balance out the watery viscosity earlier.


Now I carry this sunscreen cushion around in my bag and I can reapply sunscreen whenever needed, on top of my makeup.

I wouldn't say it is a total hit, but as much as I adore its brilliant idea and execution, it is quite an item. ;)

If you would like to read more posts like this, do leave a comment below and let's interact! :D

'Til the next time. Cheers!☺☺☺


Price List from Althea :

It’s My's Cushion Case RM23
Etude House's Sunprise Mild Watery Light SPF 50 PA+++ RM36
SON&PARK's Beauty Gel RM112
Mamonde's Rose Water Toner RM48


Watch More :

[Review] Etude House - Tint My Brows Gel #3 Grey Brown + Tutorial

April 14, 2018

[Review] Etude House - Tint My Brows Gel #3 Grey Brown + Tutorial

Hello everyone! :)

You want to have a perfect brow all-day and all-week with no life-long commitment? Is that you???

Have you tried Etude House's legendary Tint My Brows Gel?

If you haven't, read on! :D


Review; Etude House's Tint My Brows Gel #3 Grey Brown + Tutorial
Etude House's Tint My Brows Gel #3 Gray Brown | 에뛰뜨 하우스 브라우 젤 틴트 | 5g

Time fact. This product is nothing new in the market. It has been launched for more than 2 years now. But why is it so fascinating? o.o

People were all hyped up for this so-called "tattoo brow" beauty item when it launched. Why? You can style your brows whichever you wish in every week, without permanent commitment (e.g. real real tattoo).

I still can remember 2 years ago when I went for a trip to South Korea, one of us bought this magical brow tint and told us about the then-popular beauty item.

We were like, "whuttt??" And when she ended up with a bold eyebrows on the next morning, we were like, "hmm..." Not sure whether should I purchase or not. :/

But this particular item kept stucked in my head.. I wanted to try so badly... Until one day when I was so fed up with drawing my brows every morning, I made up my mind (finally!!!)


Product breakdown


There are three (3) colors available in the first launch series:

  1. Brown
  2. Light Brown
  3. Grey Brown**


**The color I am demonstrating here.

Here I am merely choosing the darkest shade from the series since I have dark hair.

#Tips: Don't know how to choose brow color? Try match your brow color with your hair color. It won't go wrong. ;)


Review; Etude House's Tint My Brows Gel #3 Grey Brown + Tutorial


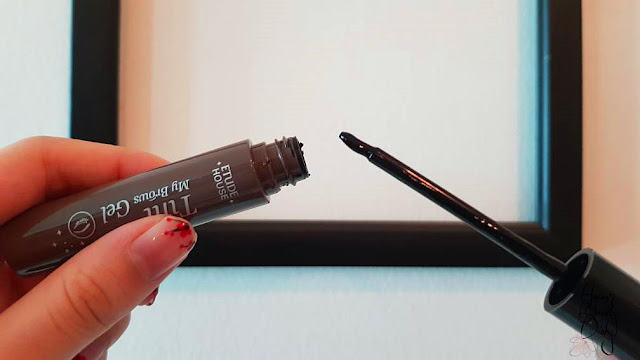
Untwist the cap and you will find a brush attached to the end (as above).

The gel itself is reaaally thick and sticky. Similar to the consistency of liquid glue.

As per instruction, you have to leave the tint until it is dried completely (best to leave overnight).

Now I am going to show you the color payoff on the back of my hand (as below) just by leaving it for a minute.


Review; Etude House's Tint My Brows Gel #3 Grey Brown + Tutorial


Wow you already can observe the tint effect just within a minute!

Let's waste no time and go straight to our tutorial corner now...!!! :D


How to Style Your Brows Using Brow Tattoo Tutorial (Basic)

In this tutorial, you gonna need two things: Tint My Brows Gel and a brow brush.


Review; Etude House's Tint My Brows Gel #3 Grey Brown + Tutorial


Here I am using B216 Brow Definer from Breena Beauty, a local cosmetic brand (talking about making Malaysia proud :D).


Review; Etude House's Tint My Brows Gel #3 Grey Brown + Tutorial; Breena Beauty


Let me tell you why using a brow brush is necessary. Of course it is! Because it provides you a better control of the brow shape you're drawing later on. Brow game is always about "on fleek", right? :)

*Disclaimer: I am no pro in the brow game. I just want my brows to look okay to be seen. (heh)

(so I'm filming with one hand and demonstrating with another... :') bear with me)

Dip the brow brush into the tint gel (as below). Don't worry about the stain, it can be cleaned off which I will show you how later on ;)


Review; Etude House's Tint My Brows Gel #3 Grey Brown + Tutorial


Welcome to the black-and-white world! :p

Due to bad lighting, the original photo came out inconsistent in lighting.

Hence, I am going to continue this tutorial in black-and-white photos. :')


① With the brow brush, start by drawing a base line / border of your designated brow shape.


② Draw an upper border of your designated brow shape using the brow brush (too!),
connecting the upper and lower border at the ends.


③ Continue using the brow brush to close the front end of the brow.


④ Fill in the empty space within the borders using the default brush attached at the cap.


⑤ Made a mistake? No worries. Grab a cotton swab and clean up that area.


Ta-da! Hello, angry bird! :p


For best result, leave it overnight to dry. When the tint gel is completely dried, you can peel it off easily, without pain (as below).


Here's the look on the next morning!
(Sleepyhead, eyes-not-yet-wake-up-look... >.<''')


The result is absolutely promising!!! The tint turned out to be very natural, completely blended with my brow. It looks natural. No lie.

Even my dad gave his compliment! (>w<)


How to Clean Your Used Brow Brush Tutorial :p

All you need is a cotton pad and some cleansing water.

Swab your brush over the cotton pad and the tint should go off easily, without hassle!


Clean as new!!! *~*


***

This product is a life-changer, that's for sure! In the events when you need waterproof makeup, this gotta be life-saver.

Worry about getting fed up with the current brow shape too soon before you regret? For my case, this tint can lasts up to about 3 days (in complete good shape like you just did), then it will slowly fade away. No long term commitment involved.

Good news!! Now Etude House has added new colors to their AD series!! You can check out their products on their official website or concept stores. ;)


I bought this product from Hermo for RM31.70.


**********************************************************************

Rating: 5/5

Recommend: Recommend for waterproof makeup and "makeup-cheat-days".

Repurchase: Yeah absolutely will keep one in my stash!

For your reference.


**********************************************************************


Is this product review helpful?

Leave a simple comment below because I long to hear from you. *^0^*

Cheers!^^

Latest Instagrams

© soulmatehyeon. Design by FCD.